Acquire Data to Disk > Activating Procedure
The Record function on the File menu controls
data acquisition to disk. When first enabled, WinDaq Acquisition is automatically
placed in the SET-UP
operating mode (the status field in the bottom annotation line indicates
SET-UP). This mode allows you to configure the front-end instrumentation
(i.e., sample rate, number of channels
![]() Click
the Open/Close File button in the Toolbox.
Click
the Open/Close File button in the Toolbox.
![]() In
the File menu click on Open….
In
the File menu click on Open….
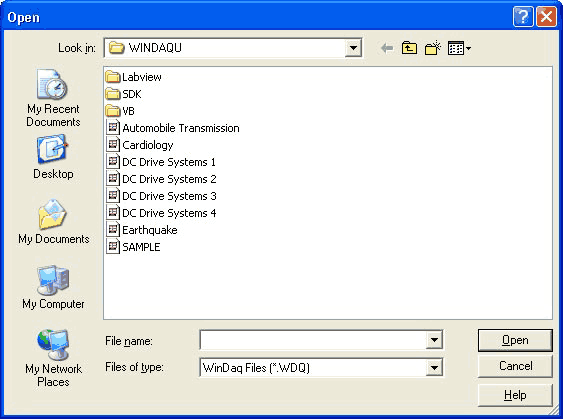
This displays the Open dialog box. Specify a file name to create a new file or open an existing file to append to it.
![]() In
the File Name list box, double-click the name of the file you want to
open.
In
the File Name list box, double-click the name of the file you want to
open.
![]() In
the File Name text box type the filename or press the TAB key then the
↑ or ↓ key to select the filename and press ENTER.
In
the File Name text box type the filename or press the TAB key then the
↑ or ↓ key to select the filename and press ENTER.
When the desired file is selected, the following confirmation box appears.
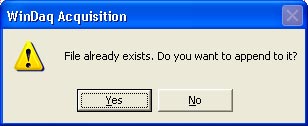
Choosing No cancels the file open procedure. Choosing Yes invokes the following File Size dialog box, which allows you to specify (in either kilobytes or time) how much additional data to add to the end of the file.
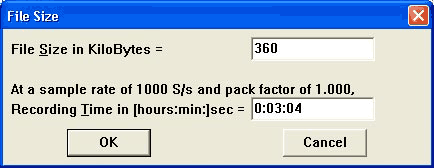
“At a sample rate of xxxx S/s,” indicates the sample (throughput) rate of the file being appended to. When appending to an existing file, this sample rate cannot be changed. In the above illustration, the sample rate of the file being appended to is 500 samples per second. This means that 360 additional kilobytes of data will be appended to the original file in 6 minutes and 9 seconds at this sample rate. Note that you can append to a file by specifying either a file size (in kilobytes) or a recording time (in hours : minutes : seconds format. Hours and minutes are optional, if omitted, they default to zero). When a value is entered in one of the text boxes, the other text box can be updated to display the other equivalent value by pressing the TAB key. At sample rates below 512 samples per second, entering recording time in seconds provides finer control than does size in kilobytes.
With WinDaq/Pro+ acquisition software, the File Size dialog box shows the current pack factor, which is the ratio of the original data file size to the data file size when different channels at different rates are employed. This pack factor is used to calculate data file size or recording time.
Enter in the text box the desired file size in kilobytes or the desired amount of time in hours:minutes:seconds. When the desired value is entered, close the dialog box by clicking OK or pressing ENTER. The Record function on the File menu is now enabled. To start acquiring data to disk, refer to Recording Data to Disk below.
Enter in the File Name box the name of the data file to which WinDaq Acquisition is to store data. When the desired file name is entered, close the dialog box by clicking OK or pressing the ENTER key.
After a valid file name is entered, the File Size dialog box is opened. This dialog box provides a way for you to specify the maximum file size (in kilobytes) or the maximum recording time (in hours:minutes:seconds) of the target data acquisition file.
“At a sample rate of xxxx S/s,” indicates the current sample (throughput) rate. In the above illustration, the current sample rate is 2000 samples per second. This means that 360 kilobytes (default value) of data will be stored to disk in 1 minute and 32 seconds at this sample rate. Note that modifying the sample rate affects both the file size and recording time. If the sample rate is unsatisfactory, you can cancel out of this dialog box and adjust the sample rate to your preference. Note that you can create a new file by specifying either a maximum file size (in kilobytes) or a maximum recording time (in hours : minutes : seconds format. Hours and minutes are optional, if omitted, they default to zero). When a value is entered in one of the text boxes, the other text box can be updated to display the other equivalent value by pressing the TAB key. At sample rates below 512 samples per second, entering recording time in seconds provides finer control than does size in kilobytes.
Enter in the text box the desired file size in kilobytes or accept the default. When the desired file size is entered, close the dialog box by clicking OK or pressing the ENTER key. The Record function on the File menu is now enabled. To start acquiring data to disk, refer to Recording Data to Disk below.
![]() Click
on the Start/Stop Recording button in the Toolbox.
Click
on the Start/Stop Recording button in the Toolbox.
![]() In
the File menu click on Record.
In
the File menu click on Record.
![]() Choose
File Record (ALT, F, R).
Choose
File Record (ALT, F, R).
This places you in the active record-to-disk operating mode where enabled analog channel data is digitized, displayed and streamed to disk simultaneously. The status field in the bottom annotation line indicates RECORD.
![]() Click
on the Start/Stop Recording button in the Toolbox.
Click
on the Start/Stop Recording button in the Toolbox.
![]() In
the File menu click on Stop.
In
the File menu click on Stop.
![]() Choose
File Stop (ALT, F, T).
Choose
File Stop (ALT, F, T).
This suspends data storage to disk, but the real time display remains active. The status field in the bottom annotation line indicates STBY when acquisition has been stopped. Note that the Stop function on the File menu only becomes enabled when in the record-to-disk operating mode.
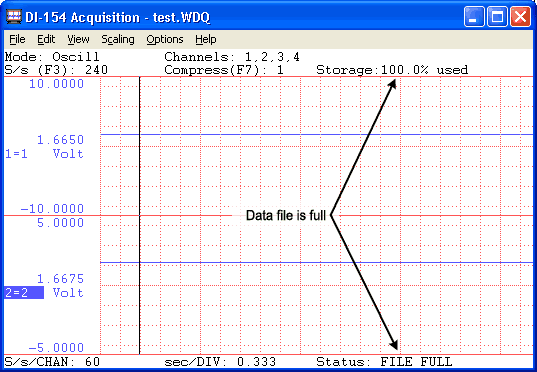
Data acquisition to disk may be started and stopped as many times as you desire. When the target data file has been filled, data acquisition to disk will cease, the “Storage:” field of the status bar will display “100% used”, and the “Status:” field of the status bar will display FILE FULL.