
Preferences > RMS Window Size
Note: This function is not compatible with Triggered Mode. Some products do not support this feature. See Special Considerations below.
Allows you to set RMS window size when using the RMS Data Acquisition Method.
![]() In
the Preferences sub-menu click
on RMS Window Size....
In
the Preferences sub-menu click
on RMS Window Size....
![]() Choose
Edit Preferences RMS Window Size... (ALT, E, P, W).
Choose
Edit Preferences RMS Window Size... (ALT, E, P, W).
This will bring up the RMS Average Window Size Dialog Box.
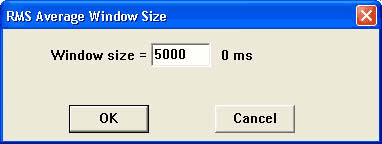
RMS Window size allows you to convert AC signals to DC data. The Window size is the number of samples being calculated to display the data. The square root of the mean square value, computed over the number of samples specified by "Window size =" is acquired and displayed for the selected channel. To achieve a stable reading you must provide an adequate Sample Rate over an integral number of cycles (i.e., Window size should cover one or more complete cycles). After setting this value, use the TAB key to display the corresponding window time.
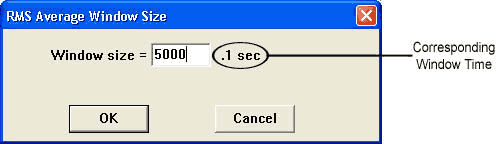
A window size of 5000 samples with a corresponding window time of .1 seconds would mean that 5000 samples at the device burst rate per channel on the selected channel, spread out over .1 seconds, are used to calculate each RMS value - i.e., if you have the maximum sample rate set at 50000 and 1 channel enabled, the software takes 5000 samples over .1 seconds (i.e., out of 5000 samples) and calculates one RMS data point. With each new data point acquired the window moves and the RMS is recalculated.
Note: Since RMS is recalculated with every newly-acquired data sample, multiple RMS channels could cause gaps in data depending on the speed of your PC. If gaps occur, lower the Maximum Sample Rate until your PC can handle the load.
For AC voltages at a stable frequency, making the window time a multiple of the cycle time will result in a stable reading. For signals with varying frequency, increasing the window size results in a more stable signal, but increases the delay and flattens amplitude variations that may be of interest.
Note: Subsequently changing the sample rate or number of channels will affect the corresponding window time.
After setting the number of samples to average you can now select the RMS setting in the Channel Settings Dialog Box. See also Acquisition Method.
This method is not for use with the DI-400 Series instruments nor for instruments using a parallel port interface and running Windows 95 or 98. Contact DATAQ Instruments for more information.
When using the Frequency acquisition method it is important that you not set the Maximum Sample Rate higher than that allowed by your instrument. Doing so may cause your computer to freeze. If using a printer port device, it is important that you not exceed these maximum sample rates.
|
Devices |
Port Mode |
Maximum Samples/sec |
|
DI-500, DI-510, DI-720, DI-730 |
EPP (Enhanced Parallel Port) |
180,000 NT/2000/XP |
|
DI-500, DI-510, DI-720, DI-730 |
EPP (Enhanced Parallel Port) |
110,000 95/98/ME |
|
DI-500, DI-510, DI-720, DI-730 |
Bidirectional (PS/2) |
60,000 |
|
DI-500, DI-510, DI-720P, DI-730P |
Standard (Compatible, Unidirectional) |
30,000 |
|
DI-220, DI-221, DI-222 |
Bidirectional (PS/2) |
25,000 |
|
DI-220, DI-221, DI-222 |
Standard (Compatible, Unidirectional) |
12,500 |