|
|
|
|
Extract Channels > Activating Procedure |
|
Before data may be extracted and placed in a disk file, the range of data must be selected. The range of data is defined as all data lying between the time marker and cursor. The range of data is selected by positioning the cursor at one desired range limit, enabling the time marker (see Time Marker), then moving the waveform cursor over to the other desired range limit. Although the range is specified only on display window one, when copied, data in all visible windows lying between the limits are copied to your specified file name (see Special Considerations for more information).
When the data range is selected the extract utility can be invoked as follows:
![]() In
the File menu click on Save
As….
In
the File menu click on Save
As….
![]() Choose
File Save As… (ALT, F,
A).
Choose
File Save As… (ALT, F,
A).
This displays the Save As dialog box. Before you enter a file name, select a file storage format. The file storage format selections appear on the right side of the dialog box as follows:
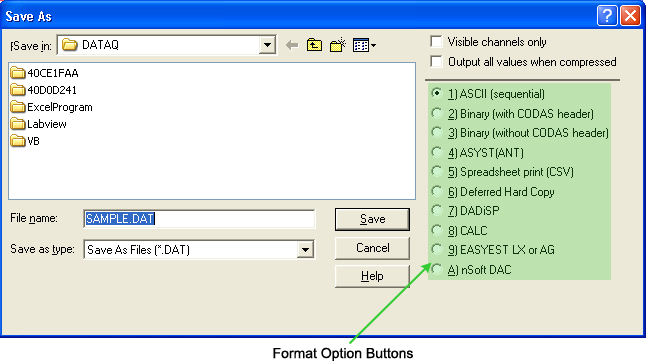
Select the storage format by:
![]() Clicking
the desired format option button. When a format is selected, a dotted
box surrounds the format name and a dark dot appears in the format option
button.
Clicking
the desired format option button. When a format is selected, a dotted
box surrounds the format name and a dark dot appears in the format option
button.
![]() Pressing
the TAB key until one of the eight formats in the list becomes selected.
When a format is selected, a dotted box surrounds the format name and
a dark dot appears in the format option button. At this point, the or
¯ cursor control keys can be used to select the desired format. Note that
you can also enter the number corresponding to the desired format rather
than using the cursor control keys.
Pressing
the TAB key until one of the eight formats in the list becomes selected.
When a format is selected, a dotted box surrounds the format name and
a dark dot appears in the format option button. At this point, the or
¯ cursor control keys can be used to select the desired format. Note that
you can also enter the number corresponding to the desired format rather
than using the cursor control keys.
See Export Special Considerations for a detailed description of all data storage formats.
With the desired format selected, enter in the text box the name of the data file (including desired path names) to which WinDaq Waveform Browser is to write the extracted channel data. When a file name is entered, extract the selected channel(s) by:
![]() Clicking
the Save command button.
Clicking
the Save command button.
![]() Pressing
the TAB key until the Save command button becomes highlighted and pressing
the ENTER key.
Pressing
the TAB key until the Save command button becomes highlighted and pressing
the ENTER key.
The data within your selected range and from the visible channels only will be extracted from the active file and placed in the specified data file.
