|
|
|
To generate a print screen:
![]() In
the File menu click on Print….
In
the File menu click on Print….
![]() Choose
File Print… (ALT, F,
P).
Choose
File Print… (ALT, F,
P).
This displays the Print dialog box. From this dialog box, you must select the data to print. You can either print the currently displayed screen contents (print screen feature) or the section of waveform bound by the time marker and cursor (continuous hard copy feature) depending on which option buttons you select.
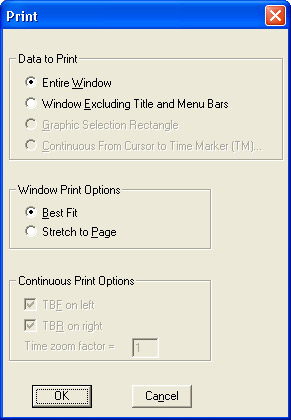
The print screen feature is enabled by choosing either the Entire Window or the Window Excluding Title and Menu Bars option buttons and activating the OK command button. When either of these options are selected, the current display shown on the monitor will be printed (hard copied) on the target printer. The two print screen formats are as follows:
Entire Window
Prints everything as displayed on the screen, could be considered a “screen shot”.
Window Excluding Title and Menu Bars
Prints only the most pertinent information about the waveform file(s) displayed on the screen. Does not print the title or menu bar at the top of the display.
Note that when either of these formats are selected, the Continuous Print Options are dimmed, thus not selectable. However, the Window Print Options are selectable. These options control the size of the print screen. The two size options are as follows:
Best Fit
Maintains the aspect ratio of the display on the screen. The size of the printout fills the page as much as possible without destroying the aspect ratio.
Fills the entire page with the printout. With the paper portrait oriented, the printed image is stretched in the vertical direction to fill the entire page, thus not maintaining the aspect ratio of the display on the screen.
