
 View Cart
 sales@dataq.com
 330-668-1444
Verify that you’re operating system is Windows 7 or later
Verify that you’re installing the correct software
Make sure that the device driver is properly installed
Make sure that your DI-145, DI-149 or DI-155 is installed on one of the first 32 COM ports
Verify that previously installed hardware/software does not conflict with WinDaq
After installing WinDaq for a DI-145, DI-149 or DI-155 device you may encounter one of the following error messages/issues:
- “No DATAQ Instruments Devices Found”
- “Error Communicating with the Device”
- The device that you are installing is not listed in the DATAQ Instruments Hardware Manager
These error messages/issues could result from one or more of the following:
- An operating system that is not supported
- You’ve installed the wrong software
- The device driver is not installed, or is installed on an unsupported COM port
- A conflict with previously installed hardware/software
To resolve these issues, follow the steps below.
Verify that you’re operating system is Windows 7 or later
Windows 7 and later are the only Windows operating systems supported. While these devices may install successfully under Windows XP, support for this operating system ended on April 8th, 2014.
Run the WinDaq installation program. Did WinDaq install properly? If not proceed to the next step.
Verify that you’re installing the correct software
You can download the installation executable (dataq_starterkits.exe) for your DI-145, DI-149 or DI-155 series instrument here.
Make sure that the device driver is properly installed
If the instrument is plugged into the PC before the installation is complete, or if sufficient time isn’t allowed for the driver to install once the unit is plugged into the PC, the driver may not install properly.
Ensure that your DI-145, 149 or DI-155 is listed in the Windows Device Manager under ‘Ports (COM & LPT)’.
To do so:
- If it isn’t already, connect the DI-145, DI-149 or DI-155 device to your PC.
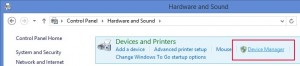
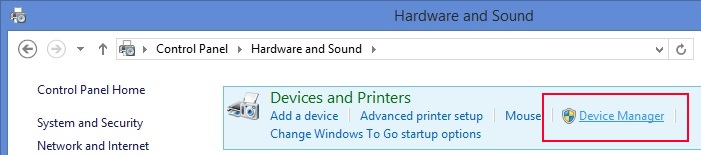
- In the Windows Control Panel select ‘Hardware and Sound’ and choose ‘Device Manager’ from the ‘Devices and Printers’ group.
 Your DI-145, DI-149 or DI-155 USB device should be listed in the Windows Device Manager under ‘Ports (COM & LPT)’.
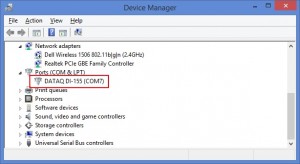 If your DI-145, DI-149 or DI-155 USB is not listed in the Windows Device Manager under ‘Ports (COM & LPT)’, it may appear under ‘Other devices’ as an ‘Unknown device’.

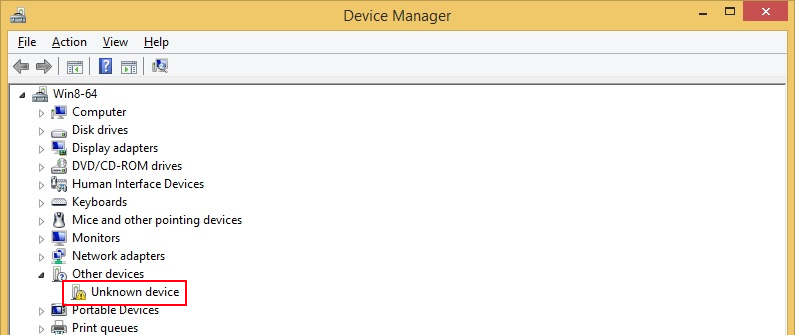
If the device shows up under ‘Other Devices’ as an ‘Unsupported Device’:
- Right-click on the ‘Unknown device’ and choose ‘Uninstall’.
- Unplug your DI-145, DI-149 or DI-155, and plug it back in again.
- Wait a minute or two for Windows to locate and install the device driver.
Run the WinDaq installation program. Did WinDaq install properly? If not proceed to the next step.
Make sure that your DI-145, DI-149 or DI-155 is installed on one of the first 32 COM ports
DLLs are installed for the first 32 COM ports only.
To determine the COM port number that your device is installed on (and change it if necessary):
- If it isn’t already, connect the DI-145, DI-149 or DI-155 device to your PC.
- In the Windows Control Panel select ‘Hardware and Sound’ and choose ‘Device Manager’ from the ‘Devices and Printers’ group.
- Your DI-145, DI-149 or DI-155 USB device should be listed in the Windows Device Manager under ‘Ports (COM & LPT)’.
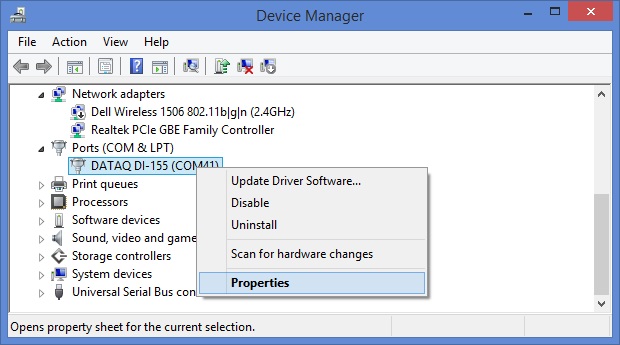
- Assuming that the device is installed on an unsupported COM portRight-click on the ‘DATAQ DI-1xx (COMxx)’ and choose ‘Properties’:
1. Right-click on the ‘DATAQ DI-1xx (COMxx)’ and choose ‘Properties’
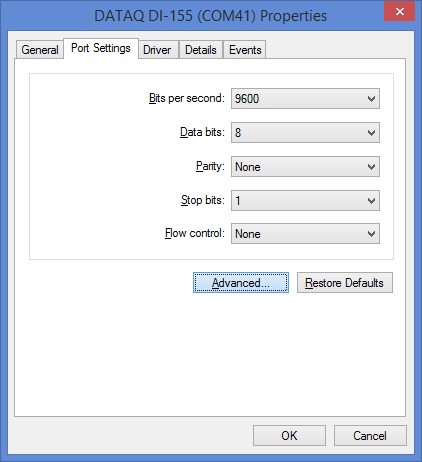
 2. Click the ‘Port Settings’ tab and click the ‘Advanced’ button
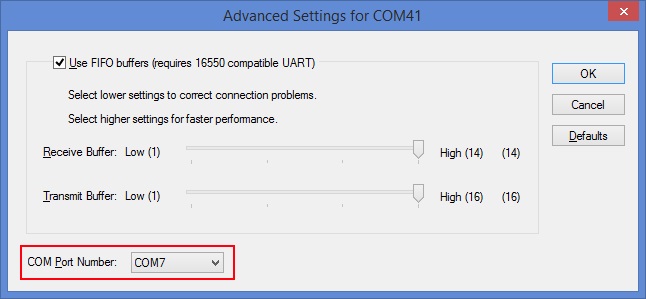
3. Click the ‘COM Port Number’ pull-down menu and choose a COM port between 3 and 32.
Run the WinDaq installation program. Did WinDaq install properly? If not proceed to the next step.
Verify that previously installed hardware/software does not conflict with WinDaq
It is possible that previously installed hardware/software (printers, digital cameras, etc.) conflicts with the WinDaq installation. To reduce the likelihood of such a conflict disable all programs in your start-up menu.
To do so:
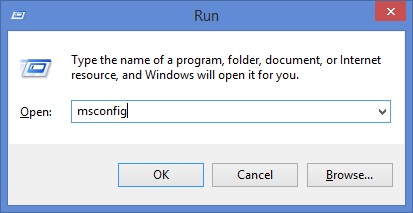
- Right-click on the Windows button (click the Start button on a Windows 7 machine) and choose ‘Run’

2. Type MSCONFIG in the run window and click the “OK” button.
3. From the ‘System Configuration Utility’, select the ‘Startup’ tab.
4. Disable any questionable items (you can re-enable them later).
Run the WinDaq installation program. Did WinDaq install properly? If so there is another application installed on your PC that conflicts with the WinDaq installation. This is not a WinDaq Installation issue, but an issue with the ill-behaved application. Identifying the responsible application is a process of elimination. Once isolated, contact the author of the conflicting application for additional support.
If you continue to experience WinDaq installation problems proceed to the next step.
The Debug710.log file will provide information pertinent to your installation issue. The support staff at DATAQ Instruments will review the debug710.log file and reply via phone or email with a recommendation.
To create and submit a debug710.log file:
- Right-click on the shortcut that you use to run the DATAQ Instruments Hardware Manager and select ‘Properties’
- Add the word debug to the end of the “Target:” line.
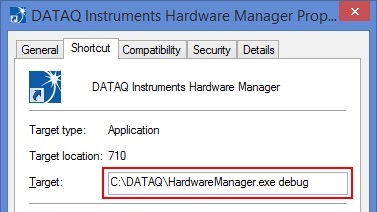
3. Run the DATAQ Instruments Hardware Manager. This will generate a debug710.log file in the directory where WinDaq is installed.
4. Click here to create a support ticket and submit you debug710.log file.
DI-145, DI-149 and DI-155 USB products.
Follow Us![]()
![]()
![]()
![]()
![]()
![]()
![]()
![]()
One Comment
william harris payne
Appear to be sending info 1 okay, but 145 responds with ERROR cr/lf. Why? Tnx in advance.