
 View Cart
 sales@dataq.com
 330-668-1444
This application note demonstrates the proper connection and calibration of a strain-gage based transducer connected to a DI-8B38 series amplifier.
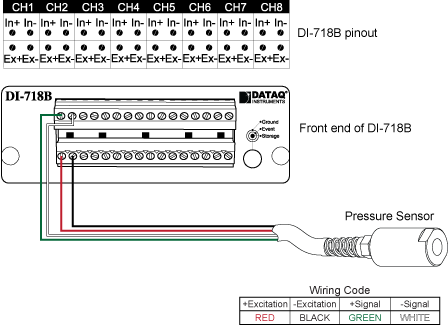
For this example we’ll use a strain-gage based pressure transducer with a 10,000 PSI capacity, an excitation (supply voltage) requirement of 10V and a gage factor (output) of 2mV/V. We’ll connect the transducer to a DI-718B housing a DI-8B38-02 amplifier, installed on channel 1.
We’ll begin by connecting the positive and negative excitation wires to EX+ and EX- and the positive and negative signal output wires to In+ and In-.
With the transducer connected to the DI-718B and WinDaq up and running, we’re almost ready to calibrate to display pressure (PSI). But first we need to calculate a positive full scale (high calibration) value to enter in WinDaq.
To determine the positive full scale value; we’ll begin by dividing the gage factor (output) of the transducer by the gage factor (sensitivity) of the amplifier. This gives us the gain ratio (R). In this case:
![]()
Next, we’ll divide the full scale measurement range of the transducer (10,000 PSI) by R to yield the positive full scale (high calibration) value:
![]()
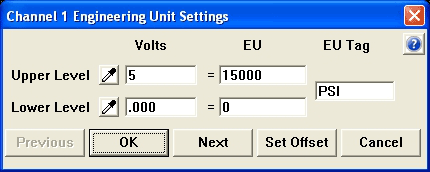
Now that we know the positive full scale value, we can use Engineering Unit Settings in WinDaq to display engineering units (PSI). Use the DI-8B38 Strain-Gage Positive Full Scale (High Calibration) Value Calculator to determine the Positive Full Scale Value you should use in your application.
We’ll begin by selecting ‘Engineering Unit Settings’ from the ‘Edit’ pull-down menu.
Since our transducer outputs 5V at 15000 PSI; we’ll enter 5 for Upper Level Volts and 15000 for Upper Level EU. We’ll enter 0 (zero) for Lower Level Volts and 0 (zero) for Lower Level EU.* For EU Tag, enter PSI.
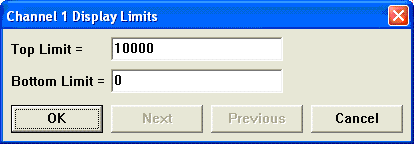
Finally, to display the actual measurement range of the transducer; we’ll select ‘Limits’ from the ‘Scaling’ pull down menu. Enter 10000 for the Top Limit and 0 for the Bottom Limit.
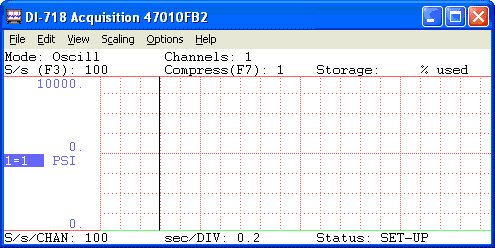
That’s all there is to it! Channel 1 now displays PSI over the full scale range of the transducer.
*Unbalanced transducers (those with a voltage offset at calibrated zero) may be forced to zero by clicking the ‘Set Offset’ button in the ‘Engineering Unit Settings’ dialog box and setting the Desired Reading to 0 (zero).
See Also How To Calibrate Strain Gage-Based Transducers Using DI-5B38 Strain Amplifiers
Additional Reading:
DI-8B38 Series Strain Amplifiers
DI-5B38 Series Strain Amplifiers
Follow Us![]()
![]()
![]()
![]()
![]()
![]()
![]()
![]()