
Sample Rate > Activating Procedure
![]() Click
the Sample Rate button in the Toolbox.
Click
the Sample Rate button in the Toolbox.
![]() In
the Edit menu click on Sample
Rate….
In
the Edit menu click on Sample
Rate….
OR
Double-click on the S/s : field in the status bar.
![]() Choose
Edit Sample Rate… (ALT, E, R).
Choose
Edit Sample Rate… (ALT, E, R).
OR
Press F3.
The sample rate dialog box opens.
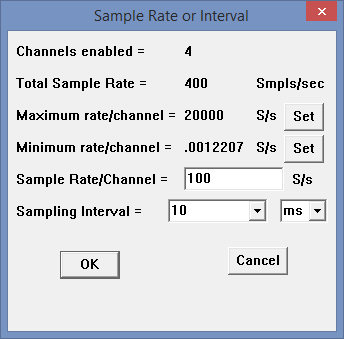
Enter the desired sample rate per channel in samples per second in the Sample Rate/Channel text box or select a sample interval in the Sampling Interval dropdown list.
Click on one of the Set buttons to have WinDaq automatically set your per channel sample rate to the maximum or minimum allowed for your device.
Click OK or press the ENTER key.
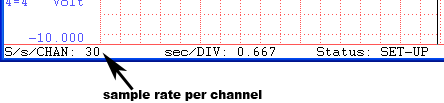
The sample rate per channel is displayed in the lower left corner of the window as S/s/CHAN: (samples per second per channel).
In order to enter a sample rate of less than 1 in the Sample Rate text box (effectively sampling about once per minute) you may also be required to lower the maximum sample rate (burst rate). See Preferences > Maximum Sample Rate.
The following diagram illustrates the relationship of maximum sample rate (burst rate) to sample rate.
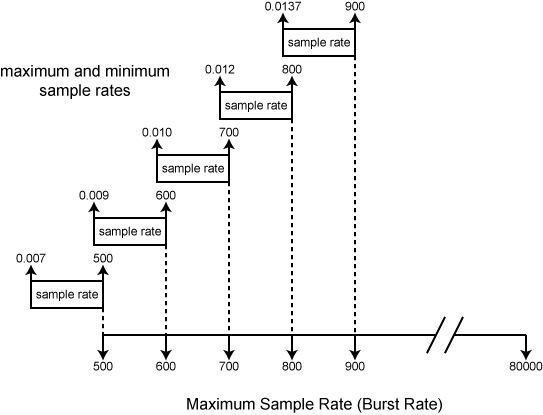
As can be seen from the illustration, the maximum burst rate must be set to the low end of its range to get a sample rate less than 1. The maximum burst rate can be restored to its previous value if desired.
The Input Buffer Size in KB value is displayed for informational purposes only in this text box, it can not be directly adjusted by the user. It indicates the size of the input buffer, which is where the acquired data will be temporarily stored (in “valuable” or scarce, contiguous Global DOS memory). The amount of memory allocated for this buffer is a function of three factors: the current sample rate, how much memory is currently being used by your computer, and the input buffer size limit (maximum amount of your computer’s memory you have dedicated to this buffer, specified from the Preferences command on the Edit menu - see Buffer Size). The Disk Buffer Size in KB value is also displayed for informational purposes only and can not be directly adjusted by the user. It indicates the size of the disk buffer, which is a temporary storage place (in “cheap” or easily-attainable, non-contiguous memory) for the acquired data before being written to disk.
However, with WinDaq Acquisition you can directly adjust or modify buffer size and sample rate, two factors that govern gap-free data acquisition.
The Preferences command on the Edit menu allows you to specify a buffer size ranging from 16kB to 128kB. The larger the buffer size, the greater the chance of acquiring gap-free data at the maximum sample rate your computer can achieve. However, the larger the buffer size, the more memory it uses, thus leaving less (perhaps not enough) for running other programs. If you never run other programs simultaneously with WinDaq Acquisition, then conserving memory is not an issue. However, if you like to run WinDaq Acquisition simultaneously with a spreadsheet program or a data analysis program, then you could limit the amount of memory allocated to the input buffer so the other applications have enough memory to run. See Buffer Size.
The Sample Rate dialog box allows you to specify sample rate. The sample rate used to determine buffer size is the old or previous sample rate value (before any changes were made with this dialog box). The amount of buffer space allocated is proportional to the sample rate. WinDaq Acquisition automatically and transparently allocates the correct amount of buffer space when you input a sample rate. However if you have increased the buffer size (Buffer Size), there is a chance that the sample rate you enter is too high for the amount of buffer space you have allocated. If this is the case, the S/s (F3): value in the status bar will be displayed in reverse video
This serves as a warning that you might not be able to reliably store data to disk with the current combination of sample rate and buffer size. See Different Ways of Allocating Memory. If the instructions therein do not help, you have two options: (1) lower the sample rate; or (2) increase the buffer size.
When the desired sample throughput rate is entered, click the OK button or press the Enter key to close the dialog box.
When the desired sample rate per channel or interval is entered, click the OK button or press the Enter key to close the box. Which edit control was used to change the rate or interval is remembered and used to highlight that control the next time the dialog is entered. File > Save Default Setup saves that preference for the next time WinDaq starts.