|
|
|
Use the Save As... command in the File menu to export a user-specified range of data from an existing data file to an Excel file.
1. Select the copy range (all data for each channel lying between the time marker and the cursor):
a. Position the cursor at the beginning of the desired range.
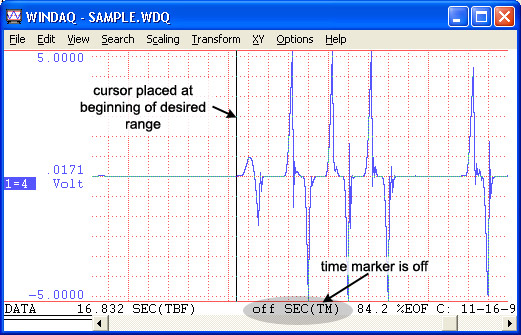
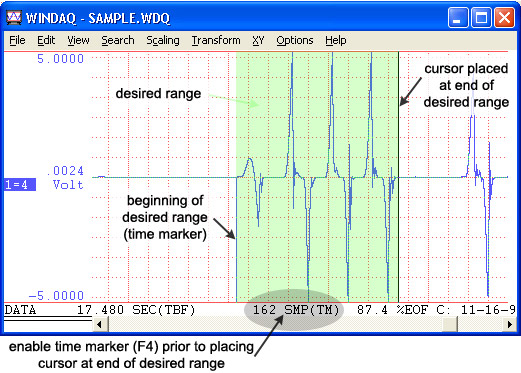
b. Press F4 to enable the time marker or select Enable Time Marker in the Options menu. This will place a check mark next to Enable Time Marker in the Options menu and will also show an increment of time in the bottom annotation line by the Time Marker (TM). When initially enabled it will show “.00 SEC(TM).” When disabled it will read “off SEC(TM).”
c. Position the cursor at the end of the desired range.
2. Click on Save As… in the File menu. This displays the Save As dialog box.
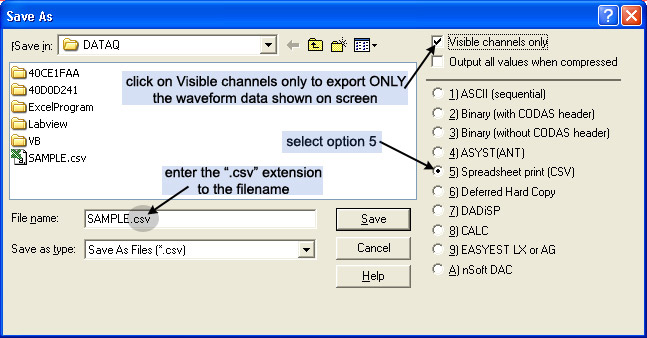
3. Select the file storage format option 5) Spreadsheet print (CSV). The file storage format selections appear on the right side of the dialog box. A description of each data storage format is included in Special Considerations.
4. Enter a file name in the File name dialog box. Include “.csv” as the file extension in the file name. For example, enter “SAMPLE.csv” into the file name dialog box. Click on Save to export the data—this copies the data within your selected range and from every channel in the file to the specified data file. To save only the channels displayed on-screen select the Visible channels only box in the top right hand portion of the Save As dialog box. To export specific channels, see the Extract Channels function in the Help Files.
5. The Spreadsheet Comments dialog box allows you to export annotations from the WWB file and allows you to add new comments. Click in the appropriate check box to transfer Sample Rate, Comments, Channel Annotation, Engineering Units, Relative Time, Event Marks, or Date and Time stamps (for each sample). After selecting the desired options and adding comments, click the OK button to close the dialog box and save the file.
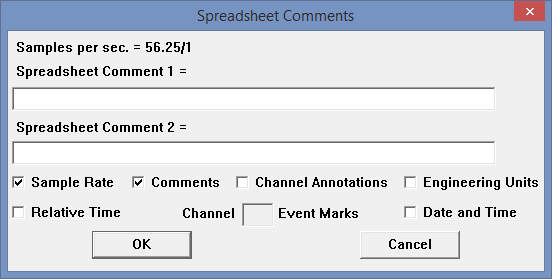
When choosing to export Event Marks (by specifying a channel in the Channel X Event Marks box), 3 columns of data are added to your spreadsheet: Ch # Marks, Event, and Start.
This column will contain points marked using the Edit > Insert Mark command. A "2" indicates a positive-going Event Mark. A "3" indicates a negative-going Event Mark. A "0" indicates there is no event mark at that data point (including trigger marks, start marks, or any other acquisition event mark). See Insert an Event Mark to insert a positive- or negative-going Event Mark using the Playback software.
If using Advanced CODAS software, there will be one peak and one valley on a channel per cycle of a periodic waveform following an Advanced CODAS Peak Capture. A "0" or "1" indicates the data sample is neither a peak nor a valley (a "1" will appear on unmarked points in channel "1" - "0" for other channels); a "2" indicates the sample is a peak; a "3" indicates the sample is a valley.
The Event column shows what event marker you are at (in numerical order - "1" indicates the sample is at event marker 1, etc.). See Event Markers.
The Start column shows whether the Event Marker is a Start event (i.e., has an asterisk when invoking View Event Markers) or not - "1" indicates that it is a Start Event Mark; "0" indicates it is not a Start Event Mark. Starts are automatically generated when restarting from a Gap, when manually restarting recording after File > Stop or File > Freeze, or when manually starting recording when appending to an existing file.
6. The file will have an Excel icon—double-click on the file to open it in Excel.
Convert data from scientific notation by changing the format of the cells to “Number” format. Highlight the data, in the Format menu click on Cells... then choose the desired format. Manipulate your data using any Excel function. Click on Chart... in the Insert menu to create a graphical representation of your data. Choosing a Line chart will output a chart identical to the waveform exported from WinDaq Waveform Browser.
