
Acquire Data to Disk > Special Considerations
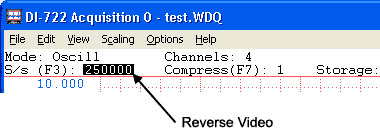
If the sample rate is displayed in reverse video when you attempt to acquire data to disk under Windows 98 or earlier, then you may not be able to reliably store data to disk. Refer to Different Ways of Allocating Memory for more details.
The default file size is 360kB (368,640 bytes). The minimum file size that may be specified is 1,156 bytes, which is equivalent to the size of the WinDaq Acquisition file header (refer to Data Storage Format for detailed information related to the WinDaq Acquisition file header). The maximum file size that may be specified is equivalent to the amount of space available on the target disk drive in bytes.
Data acquisition to disk may also be enabled and disabled remotely through a digital input port. Refer to the Remote Control function for further information.
As data is being recorded to disk, the amount of file space consumed is displayed in the “Storage:” field of the status bar as a percentage of total file space consumed.
Each time data recording to disk is activated, an event marker is automatically inserted in the waveform stream. This feature allows data acquisition break points to be reviewed through WinDaq Waveform Browser playback software. Refer to the Event Marker function in this help file and the SEARCH-FOR-EVENT function in the WinDaq Waveform Browser help file for further information related to event marker operation.
It is possible to force WinDaq Acquisition to immediately start acquiring data to disk upon start up, thus bypassing the File Open procedure and file size specification. Windows™ allows you to consolidate these preliminary recording steps (i.e., choosing File Open, specifying a file name, specifying a file size, and choosing File Record) by creating a new shortcut. To do this, you must either modify the existing WinDaq Acquisition program item or create a new program item and name it WinDaq FAST START, WinDaq AUTO RECORD, or anything similarly appropriate. To implement the “auto-record” feature:
For the next step, you must decide whether you will create a new shortcut or modify the existing program item.
If you wish to create a new shortcut, continue with step 3 below. If you wish to modify your current WinDaq Acquisition item, skip to step 4.
[d:path]di100ant.exe -ddi1??nt.dll-N$ [d:path]targetfilename [filesize] [-F[d:path]setupfile] -A.
Where:
items in brackets [] are optional.
[d:path]
is the drive and directory where file di200ac.exe resides.
[d:path]targetfilename
is the name of the data file (including optional drive, path, and extension specifiers) to which WinDaq Acquisition is to store data (the target file).
?? is the two-digit COM port number of a serial device on a COM port or USB virtual COM port. For other device types, replace di100ant.exe with di200ant.exe (or di316ant.exe for DI-2108 or DI-2108-P USB or di416ant.exe for other HiRes software), and replace the 1 and following ?? in the DLL name with:
221-223 for DI-220/221TC on LPT1-3
320-339 for DI-2108 USB
340-359 for DI-2108-P USB
40x for DI-400/410 on WinRT device x
501-503 for DI-720 series on LPT1-3
70x for DI-700 with jumpers set to x
720-735 for DI-720 series USB
800-859 for DI-720 series Ethernet
860-869 for DI-7002/7003
-N$ is optional for COM port or USB virtual COM port devices if specified in the CODASPAR.BIN setup file by Dataq Instruments Hardware Manager or at installation, but otherwise required.
$ is the COM or LPT port number, USB or WinRT device number, first 8 hexadecimal digits of serial number(s) for DI-2108 USB separated by commas or empty string for all connected devices, or Ethernet IP address.
The -D and -N arguments are not used with the old di200ac and di100ac programs under Windows 98 and earlier with a TSR program installed in C:\AUTOEXEC.BAT.
[filesize] or [hh:mm:ss]
is an optional number that specifies the maximum file size of the target data acquisition file. If not specified, the filesize defaults to 360 kb. The minimum size that may be specified is 1,156 bytes, which is equivalent to the size of the WinDaq Acquisition file header. The maximum size that may be specified is equivalent to the amount of space available on the target disk drive in bytes. A file size using “K” nomenclature may be supplied. The “K” designator is interpreted as being equal to 1024. For example, if “100K” is specified, the file size created is 102400 (1024 x 100) bytes. It is not necessary to use “K” nomenclature when specifying data file size. Alternately, you may specify a time duration (in hh:mm:ss format) instead of byte file size.
The actual size of the waveform data file ultimately created on disk following data acquisition depends on the following: If WinDaq Acquisition is terminated before the end of the data file is reached, the size of the resulting data acquisition file will be less than that specified by filesize. WinDaq Acquisition data only consumes enough of the target file to contain its acquired waveform information, releasing the excess. If WinDaq Acquisition is terminated without storing any data to disk, a file will exist that contains only the WinDaq Acquisition data file header. This file may be deleted or used as a set up file to provide default conditions for another data acquisition file. If WinDaq Acquisition is allowed to acquire data to disk until the target data acquisition file is full, the file size of the target file may or may not be exactly equal to that specified in the command line. The precise size depends upon the number of channels enabled during acquisition and whether this number is an even multiple of the specified file size. When specifying a file size, remember that one sample stored to disk requires two bytes.
See Data Storage Format for more information regarding file structure and size.
[-F[d:path]setupfile]
is an optional previous data acquisition file (including optional drive, path, and extension specifiers) created by WinDaq Acquisition that when specified, forces WinDaq Acquisition into exactly the same configuration as “setupfile”. Virtually all data acquisition parameters are ported from the setup file to become the default conditions of the new data acquisition file specified by d:\path\filename.ext. Such parameters include but are not limited to: the number of channels and type enabled, scaling constants, engineering units, display format, compression, display mode, DAC offsets, and gain. The purpose of the setup file is to allow instantaneous setup for similar but separate data acquisition runs.
-A
is the switch that forces WinDaq Acquisition to immediately start acquiring data to disk upon start up.
Examples
C:\WinDaq\DI200AC.EXE TEST1.DAT -A
TRIAL1 -A
C:\WinDaq\DI200AC.EXE TEST1.DAT 200K -Fdata.dat -A
[d:path]di200ac.exe [d:path]targetfilename [filesize] [-F[d:path]setupfile] -A.
Refer to step 3b above for an explanation of the arguments.
The command line should be executed with the current directory set to the subdirectory named for the device serial number, or the CODASPAR.BIN setup file from that subdirectory should be first copied to the directory where DI100ANT.EXE resides. The first alternative will allow multiple program items for multiple devices and put data files in their respective subdirectories, and can be accomplished by preceding di100ant.exe on the command line with: "START /Dd:devpath "
For example: START /Dc:\dataq\4D70FADD c:\dataq\di100ant.exe -Ddi104nt.dll -N4 test00.wdq 1:00 -A
To avoid appending to the same file, this requires a different filename in the program item or command line in a batch file. WinDaq therefore allows an asterisk for the filename, with file AUTORCRD.INI in the directory where CODASPAR.BIN resides retaining the name of the most recently recorded file (without the path but with the extension). By using a numeric tail on the base filename, the command line records the next file in sequence whenever it is used, returning to and overwriting a file with a name ending in zeroes after recording a file with a name ending in all nines.
It is possible to run WinDaq Acquisition in a slave mode, where some other application controls WinDaq Acquisition and at the same time prevents the user from doing so. It is also possible to send messages or otherwise communicate with WinDaq Acquisition (through Windows) without preventing user interaction. For complete slave mode details, contact technical support.