|
|
|
(Continuous From Cursor to Time Marker (TM))
To generate an immediate, continuous hard copy, you must first select a range of waveform data to be hard copied. This range is selected in a manner similar to that of the Export function. The hard copy range is defined as all data for each enabled channel lying between the time marker and cursor. The range is selected by positioning the cursor at one desired hard copy range limit, enabling the time marker (by pointing to the Options menu and selecting Enable Time Marker; by choosing Options Enable Time Marker with ALT, O, M keystrokes; or by using the F4 accelerator key), then moving the cursor over to the other desired range limit. Although the range is specified only on waveform window one, when copied, data for all channels lying between the limits may be enabled for hard copy. See also Time Marker.
Note that each waveform channel should be scaled, offset, calibrated, and compressed on the screen display exactly the way you would like it to appear when hard copied. Also note that grid lines will be printed if enabled for display.
When the hard copy ranges are selected as described above, the continuous hard copy feature is invoked by:
![]() In
the File menu click on Print….
In
the File menu click on Print….
![]() Choosing
File Print… (ALT, F,
P).
Choosing
File Print… (ALT, F,
P).
This displays the Print dialog box. From this dialog box, you must select the Continuous From Cursor to Time Marker (TM)… option button in order to generate a continuous hard copy.
Note that when the Continuous From Cursor to Time Marker (TM)… format is selected, the Window Print Options are dimmed, thus not selectable. However, the Continuous Print Options are selectable. These check boxes allow the user to enable or disable the annotations in the left and right margins of the hard copy and to set a time zoom factor. A time zoom factor can be entered to enhance readability when printing on a high resolution printer (300 dpi or higher). For example at a time zoom factor of 1 printed at 300 dpi, there will be 300 samples per vertical inch of waveform. This may not reveal enough important detail in the waveform. Increasing the time zoom factor allows you to vertically spread out the samples (the horizontal dimension remains unchanged) for better visibility. Back to our example, a time zoom factor of 2 would produce 150 samples per vertical inch and thus more detail in the hard copy. Set these options as desired and activate the OK command button. When the OK button is activated, the screen will be cleared and the following dialog box will be displayed:
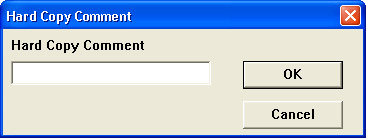
You have the option of entering up to one full line (70 characters) of text (comments) that will be passed to the hard copy record. After your comments are entered, or if you choose not to comment, activate the OK command button. At this point, waveform hard copy will begin at your printer.
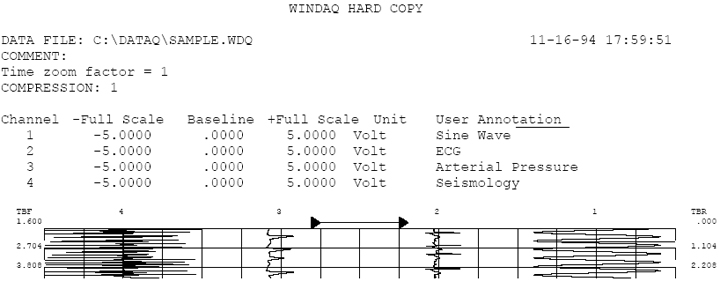
Sample output with time zoom factor of 1.
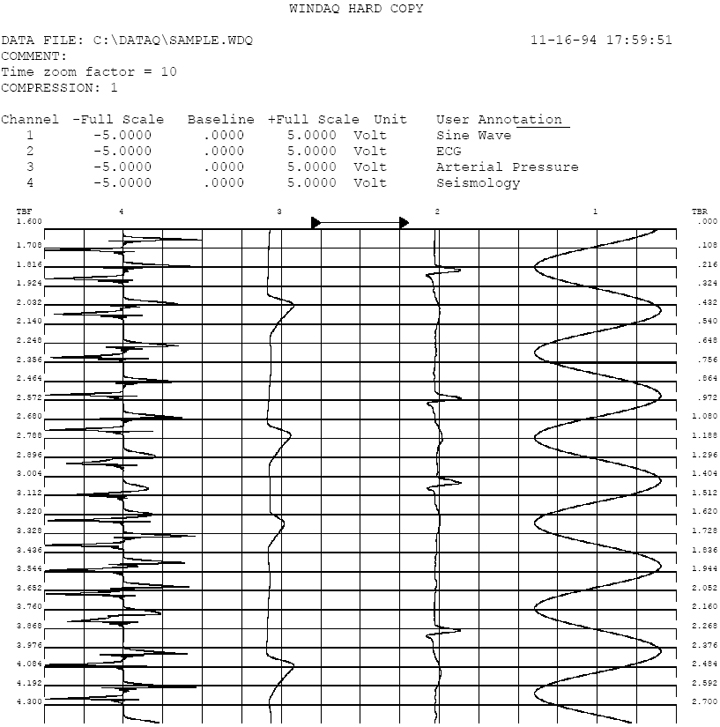
Sample output with time zoom factor of 10.
NOTE: When inserting comments in this mode, pressing control Q will insert the date and time of where your cursor appears. If you want the time to represent the beginning of your file, place and cursor at the beginning and a time marker at the end.
