
 View Cart
 sales@dataq.com
 330-668-1444
DATAQ Instruments Developer Network
VBA for Excel and WinDaq/XL
 |
|
 |
Need Help? Download the ActiveX Help file or post a question to the Developer Support Forum. |
Use WinDaq/XL to port data in real time from WinDaq to a Microsoft Excel spreadsheet. FREE 60 day Trial. Click here to learn more.
How do I add DATAQ ActiveX controls to my project in Excel - Visual Basic for Applications? | How do I Control WinDaq/XL from VBA?
How do I add DATAQ ActiveX controls to my project in Excel - Visual Basic for Applications?
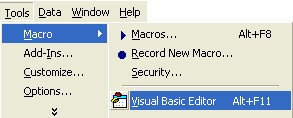
STEP 1: To add the DATAQ ActiveX components to your Excel project, click Tools>>Visual Basic Editor (Alt+F11) to open the VBA screen.
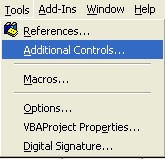
STEP 2: Add a form to your project. While the form is selected, click Tools>>Additional Controls.
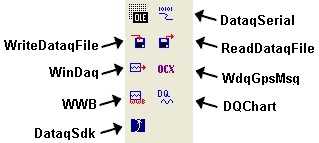
From the Additional Controls box, select the DATAQ ActiveX Controls that you want to add to your project (DataqSdk, DataqSerial, DQChart, ReadDataqFile, WinDaq, WriteDataqFile, WWB), click OK.
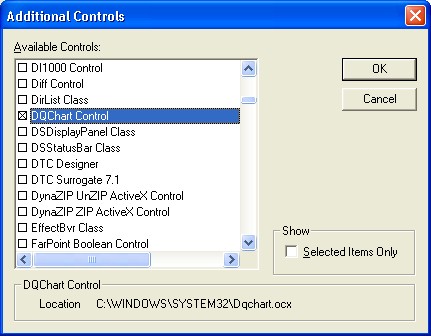
The selected DATAQ ActiveX Controls will now appear in your toolbox and you can add them to your form.
How do I Control WinDaq/XL from VBA?
It is possible to Start and Stop WinDaq/XL and control some of the import options from Visual Basic for Applications (VBA) in Microsoft Excel.
Step 1: Add WinDaqXLVBA Add-In as a Reference to your VBA project.
Go to Tools>>References and put a check mark next to WinDaqXLVBA.
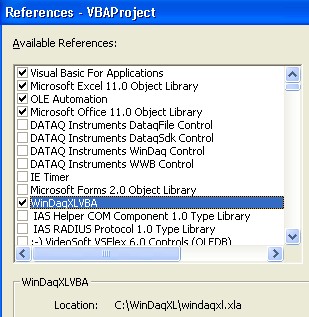
If WinDaqXLVBA does not appear as an available reference you may have to browse for the windaqxl.vba file. Click Browse, then go to C:\WinDaqXL folder, select windaqxl.vba. You will need to Browse for all file types to see the .xla file.
Please Note: WinDaq/XL Version 1.60 or greater is needed. Click here to download the latest version.
Step 2: Use WinDaqXLVBA functions from Excel VBA in your custom program. If you need access to a WinDaq/XL feature that is not listed below, submit a ticket online.
| VBA Syntax | Description |
| WinDaqXLVBA.StartRecording | Start Recording using the settings from the last import. NOTE: If used from a custom form, the form must be hidden before the import will start. |
| WinDaqXLVBA.StopRecording | Stop Recording |
| WinDaqXLVBA.ShowSetUpForm | Display the set-up form to define WinDaq/XL settings. |
| WinDaqXLVBA.SelectStartCell(StartCell As String) | Select the Starting Cell. |
| WinDaqXLVBA.SelectRowsToFill(RowsToFill As String) | Select the number of Rows to Fill. |
| WinDaqXLVBA.TimeStampEnabled(TimeStamp As Boolean) | Enable or disable the Time Stamp feature. True = enabled, False = disabled. |
| WinDaqXLVBA.TriggerImportEnabled(TriggeredImport As Boolean) | Enable or disable the Triggered Import feature. True = enabled, False = disabled. NOTE: This feature must be enabled to use the other trigger options. |
| WinDaqXLVBA.TriggerAutoReArmEnabled(AutoReArm As Boolean) | Enable or disable the Triggered Auto-ReArm feature. True = enabled, False = disabled. |
| WinDaqXLVBA.TriggerChannels(Chn1 As String, Chn2 As String, Chn3 As String, Chn4 As String) | Set up to 4 channels for applying trigger values. Channel designations for triggers 2-4 are optional. |
| WinDaqXLVBA.TriggerOperator | Select the operator for each channel with a trigger value. Possible operators are =, >, <, <=, >= |
| WinDaqXLVBA.TriggerValues | Select the trigger value for each channel that is set-up. |
| WinDaqXLVBA.TriggerAndOr | Set up to 3 AND/OR operators to add multiple trigger values. |
Step 3: Write your custom VBA code. Below is example code of how to use some of the WinDaqXLVBA functions.
Sub ControlWinDaqXL()

   WinDaqXLVBA.SelectStartCell ("A5")

   WinDaqXLVBA.SelectRowsToFill ("10")

   WinDaqXLVBA.TimeStampEnabled (True)

   WinDaqXLVBA.TriggerImportEnabled (True)

   WinDaqXLVBA.TriggerChannels 1, 2

   WinDaqXLVBA.TriggerOperator "<", ">"

   WinDaqXLVBA.TriggerValues "0.3", "0.002"

   WinDaqXLVBA.StartRecording

End Sub