
 View Cart
 sales@dataq.com
 330-668-1444
Getting data into Microsoft Excel format is one of the most common customer requests. Often times customers are dealing with numerous data files, and the prospect of manually converting those files, one-by-one, into .CSV format.
Fortunately, the software engineering team here at DATAQ has a solution! In conjunction with the WINDH32.EXE (WinDaq Waveform Browser), the WDQTOCSV.EXE utility allows users to automatically generate .CSV files, and even combine them, without having to remove header lines or write a separate program.
To do so, download the WDQTOCSV.EXE utility at https://support.dataq.com/viewtopic.php?f=4&t=15&p=6390&hilit=+excel+batch#p6390
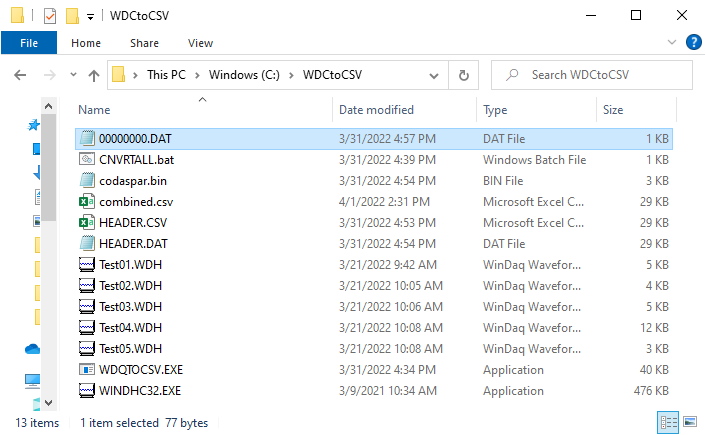
Next, in a folder where a set of .WHC files* reside along with the WinDaq Waveform Browser application (WINDHC32.EXE), a CODASPAR.BIN setup file and the WDQTOCSV.EXE utility, create a batch file called CNVRTALL.BAT containing the following:
for /r %%a in (*.WHC) do (
if exist “%%a” WDQTOCSV “%%a”
)
Place the CNVRTALL.BAT file in the folder as well.
Open one of the WinDaq data files in the WinDaq Waveform Browser (WINDHC32.EXE ) and save the file in Spreadsheet Print format with the file name HEADER.CSV.
In the ‘Save As’ window, remove checkmarks for all checkboxes except for “Relative Time” & “Date and Time”, and enter a ‘1’ between “Channel” and “Event Marks”, since other options add columns instead of header rows.
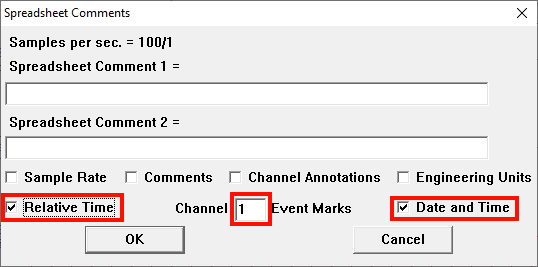
Enter filename 00000000.DAT, and click ‘Save’ to set up CODASPAR.BIN for saving data rows only.
Next, open HEADER.DAT in Notepad and highlight the header rows by clicking the top left corner and dragging down to the start of the first data row.
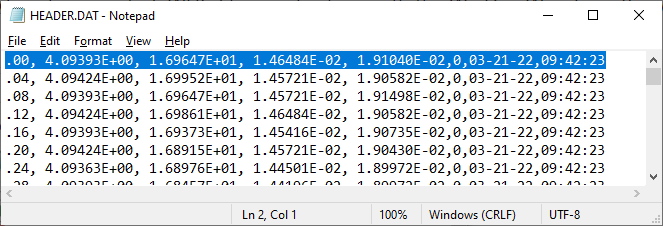
Press Ctrl+C to copy those rows to the clipboard. Click File, New and press Ctrl+V to paste them, then File, “Save As…” to save them, replacing file 00000000.DAT created earlier.
From a Command Prompt, type:
C:\Users\[UserName]>CD \[DataPath]
C:\[DataPath]>CNVRTALL
C:\[DataPath]>TYPE *.DAT >COMBINED.CSV
C:\[DataPath]>COMBINED.CSV
If the .CSV extension is associated with Microsoft Excel, these commands will start and import the combined file with header rows. After reformatting columns, save the result as a workbook with with a .xlsx extension, leaving COMBINED.CSV untouched for the inclusion of newer data. In this case, you’ll want to rename the existing .WHC files with a different extension, or copy them to a different folder before deleting.
If additional files may be recorded with the same setup and later copied to the same folder, you can type:
C:\[DataPath]>COPY COMBINED.CSV HEADER.CSV
C:\[DataPath]>DEL *.DAT
C:\[DataPath]>COPY HEADER.CSV 00000000.DAT
C:\[DataPath]>CNVRTALL
C:\[DataPath]>TYPE *.DAT >COMBINED.CSV
C:\[DataPath]>COMBINED.CSV
This will start Excel, and import the combined file with the newly created rows at the end. If something goes wrong, CNVRTALL and HEADER.DAT will contain the old COMBINED.CSV as a backup to retry after fixing or deleting problems such as improperly closed files.
* The procedure works with .WDH files as well
Additional reading:
Data Acquisition in Microsoft Excel – How to Import Recorded Data
Follow Us![]()
![]()
![]()
![]()
![]()
![]()
![]()
![]()