
 View Cart
 sales@dataq.com
 330-668-1444
Data Acquisition in Microsoft Excel—How to Import Recorded Data
In our experience, Microsoft Excel is the most popular application for waveform analysis. Our customers ask about porting waveform data to Excel more so than all other applications combined. WinDaq software (both recording and playback software) has the ability to easily port waveform data to Excel. There are 3 ways to get your data from a DATAQ Instruments hardware device to Microsoft Excel: WinDaq/ExcelLink Add-on software, the Export to Excel WWB File function, and the Save As .CSV WWB File function.
WinDaq/ExcelLink
WinDaq/ExcelLink is a WinDaq to Excel real time link - you can stream data in real time to Excel at high speed with many powerful trigger methods. For more information and to download a trial version of ExcelLink, go to The WinDaq/ExcelLink product page.
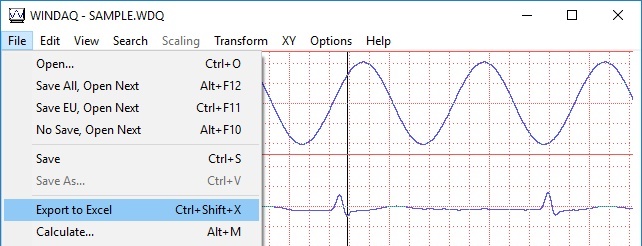
Export to Excel WWB File Function
The Export to Excel WWB menu option makes it easy to export recorded data into Microsoft Excel. Open your .WDQ, .WDH, or .WDC file and select File >> Export To Excel.
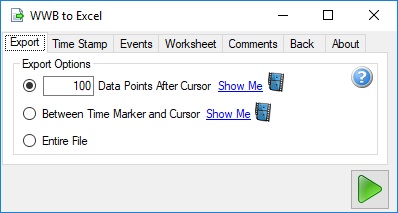
The WWB to Excel settings box will display. You can select to import the entire file, or just a section of the data that you define. You can even continue to move the cursor in WWB after you have imported into Excel to display different sections of data. Other settings allow you to define the time stamp, highlight event markers and name your spreadsheet. Take a look at our YouTube channel for a demonstration of this function: https://youtu.be/-EuyeeKMhko
Save As... .CSV (Comma Separated Variable) WWB File Function
The Save As... WWB File Function allows you to save your data into a .CSV (Comma Separated Variable) file. Open your .WDQ, .WDH, or .WDC file and select File >> Save As... If the Save As... option is greyed out it means that Options, "Enable Time Marker" is not checked. To export the whole file, press Ctrl+End to move the cursor to the end of the file, then press F4 to enable the Time Marker and press Ctrl+Home to move the cursor to the start of the file. File Save As exports data between the cursor and the Time Marker inclusive. Newly-acquired files normally have the cursor at the start and the Time Marker enabled at the end of the file. Take a look at our YouTube channel for a demonstration of this function: https://www.youtube.com/watch?v=DURjz2anNZw
