
 View Cart
 sales@dataq.com
 330-668-1444
As mentioned in an earlier post, acquiring pressure data is a common and important data acquisition application. Whether you’re dealing with air, fuel or water, pressure data can be an invaluable decision-making resource.
In this application note, we’ll demonstrate the ease with which you can acquire pressure data using a 0-100 psig 4-20 mA pressure transmitter, and a DATAQ Instruments model DI-2008.
While you could use almost any Dataq data logger for this application, we chose the DI-2008 because of it’s built-in 15VDC supply, capable of providing the necessary excitation voltage to the transmitter (the web-based DI-808 also features a 15V supply). In addition, the DI-2008 features programmable gain settings of ±10, 25, 50, 100, 200, 500 mV; ±1, 2.5, 5, 10, 25 and 50 V full scale. So you can optimize the resolution of the pressure measurement. For more on ADC resolution, please see the article How Much ADC Resolution Do You Really Need?
Connection
We’ll begin by connecting the pressure transmitter to the DI-2008. The pressure transmitter has two connections; an output and an excitation (supply) connection. We’ll connect the output to the positive (+) terminal on one of the analog inputs, and the supply connection to the +15V pin on the top row of screw terminals. Finally, we’ll run a wire from the ground (GnD) terminal of the DI-2008 to the negative (-) of the analog input channel. A 250 Ohm shunt resistor (included with the transmitter) is also connected across the chosen analog input (as shown below). The shunt resistor yields a 1 to 5V signal over the 4-20mA output range of the transmitter.
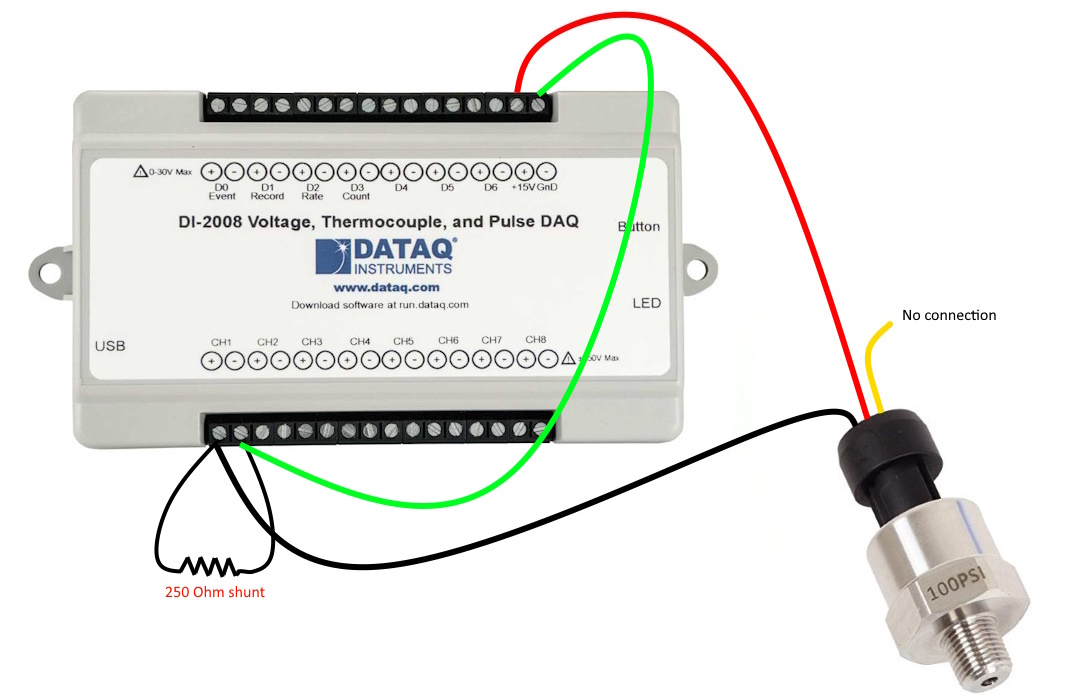
While the pigtail includes a third wire (typically yellow), it is not connected (N/C) in this case.
Setup and Scaling in WinDaq
For the best possible resolution, we’ll begin by changing the gain to 10, for a ±5V full-scale measurement range.
To scale WinDaq to display pressure (psi) instead of volts. Choose ‘Engineering Unit Settings’ from the ‘Edit’ pull-down menu. Enter 5 for Upper Level > Volts and 100 for Upper Level > EU. For Lower Level > Volts enter 1 and for Lower Level > EU, enter 0. You can enter psi as the EU Tag.
Because the sensor output is linear, a change in pressure will result in a directly-proportional change in the voltage across the 250 Ohm shunt resistor. For example, if pressure rises to 20 psi (20% of the full scales range of the sensor), the output signal will rise to 1.8V (20% of the full-scale voltage output).
In our example, pressure will never drop below 0 psi, nor will it rise above 60 psi, so we will choose ‘Limits’ from the ‘Scaling’ pull-down menu and enter ’60’ for as the Top Limit, and ‘0’ as the Bottom Limit.
With WinDaq scaled to display pressure in psi, applying pressure to the sensor yields a curve, showing pressure rise and fall with respect to time.
Follow Us![]()
![]()
![]()
![]()
![]()
![]()
![]()
![]()